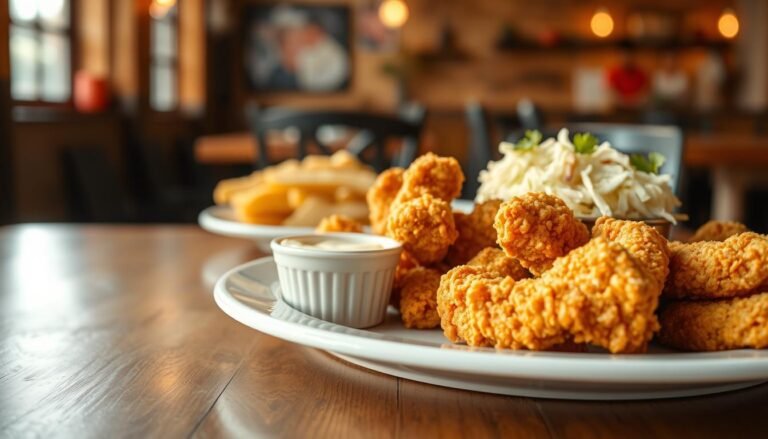
Raising Cane’s Chicken Tenders
We are excited to share our perfected copycat recipe for Raising Cane’s Chicken Tenders. Our goal is to bring the restaurant experience home with clear steps and simple pantry items.
We tested this raising cane chicken method for consistent results. Total time for the full process is 2 hours and 45 minutes, including a 20-minute prep period.
These chicken tenders deliver juicy meat and a golden crust that stands up to the original. We also include a homemade sauce that pairs with every bite.
Whether you plan a small dinner or friendly gathering, these cane chicken strips take only minutes to finish once you start cooking. Follow our guide to recreate the signature taste in your own kitchen.
Essential Ingredients for Authentic Flavor
Begin with a focused list of ingredients that deliver the signature taste and crisp texture. We recommend using 1.5 cups of buttermilk to tenderize the meat; its mild acids help break down proteins for juicier results.
Our recipe calls for 2 pounds of chicken but you can substitute with boneless chicken breasts cut into uniform strips. For the breading, combine all-purpose flour and cornstarch in a large bowl with garlic powder, onion powder, paprika, kosher salt, and black pepper.
- Use a cup of neutral oil for frying to reach a golden brown.
- Include real garlic and onion spices for the classic savory profile.
- Serve with crinkle fries and your preferred sauce for an authentic experience.
| Ingredient | Amount | Purpose |
|---|---|---|
| Buttermilk | 1.5 cups | Tenderizes and adds tang |
| Chicken (tenders or breasts) | 2 pounds | Primary protein; use strips for even cook |
| Flour & Cornstarch | 2 cups total | Light, crispy breading base |
| Spices (garlic powder, onion powder, paprika, black pepper, kosher salt) | To taste | Signature flavor for raising cane chicken style |
| Oil | 1 cup | For frying to golden brown |
Preparing the Perfect Marinade
Marinating properly is the secret that unlocks juicy, flavorful results. We begin with a simple wet mix that tenderizes and seasons the meat before it ever meets the flour.
The Importance of Buttermilk
We whisk 1.5 cups of buttermilk, one large egg, 2 teaspoons kosher salt, and a pinch of black pepper in a large bowl. Add garlic powder and onion powder to the mixture to layer flavor early.
Next, add chicken and turn each piece so it is fully coated. Cover the bowl with plastic wrap and chill. We recommend at least 2 hours, though overnight yields the best results.
- Buttermilk and egg enzymes break down proteins for tender meat.
- Using a large bowl makes it easy to stir and coat every piece.
- After marinating, the pieces are ready for the seasoned flour and final fry.

| Component | Amount | Purpose |
|---|---|---|
| Buttermilk | 1.5 cups | Tenderizes and adds tang |
| Large egg | 1 | Helps bind marinade to meat |
| Kosher salt & black pepper | 2 tsp salt, pinch pepper | Seasoning for depth of flavor |
| Garlic powder & onion powder | To taste | Infuses savory notes into the meat |
| Chicken pieces | As needed | Coated and ready for breading after marinate time |
Mastering the Breading Technique
Mastering the breading step turns good chicken into a restaurant-style plate at home. We focus on a simple, repeatable method that yields a light, shaggy crust and consistent golden brown results.

Achieving the Crispy Coating
In a large bowl we whisk 2.5 cups of flour with 0.5 cups cornstarch, paprika, garlic powder, onion powder, and kosher salt. That flour mixture is the backbone of our crust and helps the breading go golden brown.
To coat, dredge each piece in the flour, dip back into the marinade, then press more flour onto the surface and repeat. Pressing the flour helps the coating adhere, producing an even, crispy finish.
Avoiding Soggy Results
We fry in small batches so the oil stays at 350F. If the oil drops, the breading soaks up oil and loses its crunch. Make sure the oil is hot enough before you add chicken to the pan.
- Rest fried pieces on a wire rack over a baking sheet to keep air flowing.
- Use a timer and keep each batch to a few minutes until golden brown.
- Finish on a rack while you fry remaining pieces; this keeps fries and sauce ready for serving.
| Step | Why it matters | Target result |
|---|---|---|
| Flour + cornstarch mix | Creates light, crispy texture | Shaggy, golden brown crust |
| Double dredge (flour → marinade → flour) | Improves adhesion | Uniform coating that stays on |
| Wire rack rest | Prevents steam sogginess | Crisp exterior that lasts |
Frying Your Raising Cane’s Chicken Tenders
Start frying only when the oil hits 350F; this keeps the coating crunchy and the meat juicy.
We heat 2 inches of peanut oil in a heavy-duty skillet and use a deep-fry or candy thermometer to monitor the temperature. Add chicken carefully and work in small batches to avoid crowding. Overcrowding drops the oil temperature and leads to greasy breading.
Fry each batch for 3 to 4 minutes until the exterior is deep golden brown. Use a meat thermometer to confirm the internal temperature reaches 165F before removing any pieces.
Transfer fried strips to a wire rack set over a baking sheet to drain excess oil and keep the crust crisp. Resting on a rack prevents steam from sogging the coating and helps maintain texture.
- The buttermilk marinade plus the flour mixture keeps the inside juicy while frying.
- Avoid reheating in the microwave; it ruins the crispy finish.
- Following these steps lets us produce large batches for parties, with consistent fried chicken quality every time.

| Step | Target | Tool |
|---|---|---|
| Oil temperature | 350F | Deep-fry thermometer |
| Fry time | 3–4 minutes per batch | Timer |
| Finish check | 165F internal | Meat thermometer |
Crafting the Signature Dipping Sauce
Our signature dipping sauce ties every bite together with a bright, tangy finish.
We combine 0.75 cups of mayonnaise, 3 tablespoons of ketchup, and 1 tablespoon of Worcestershire sauce in a medium bowl. Then we add garlic powder, onion powder, kosher salt, paprika, and a pinch of black pepper.
We whisk until smooth and transfer the mixture to an airtight container. The sauce improves with time, so we chill it in the fridge at least 24 hours; for best results, store for 3 days.
- Adjust garlic or pepper if you want more bite.
- Serve in a small bowl beside fries and strips for easy dipping.
- Keep the sauce in an airtight container up to a week for best flavor.
| Ingredient | Amount | Purpose |
|---|---|---|
| Mayonnaise | 0.75 cup | Creamy base |
| Ketchup + Worcestershire | 3 tbsp + 1 tbsp | Sweetness and umami |
| Spices (garlic, onion, pepper, salt) | To taste | Zesty, balanced flavor |
Tips for Storing and Reheating Leftovers
Storing and reheating leftovers the right way keeps your meal tasting fresh all week.
We store cooled pieces in an airtight container in the fridge for up to 3 to 4 days. Keep the cane sauce in a separate airtight container so the breading stays crisp and the sauce stays bright.
For longer storage, freeze portions in a freezer-safe bag for up to 4 months. Label the bag with the date and place the sauce in the fridge, not the freezer.
- Reheat in an air fryer or oven on a wire rack for even heat and a golden brown finish.
- Lightly spray with peanut oil or vegetable oil before reheating to revive crunch.
- Avoid the microwave; it makes the breading soggy and ruins texture.
- If you used chicken breasts, store and reheat them the same way for best results.
| Item | Storage | Time |
|---|---|---|
| Cooked strips | Airtight container, fridge | 3–4 days |
| Frozen pieces | Freezer-safe bag | Up to 4 months |
| Cane sauce | Airtight container, fridge | Up to 3 days |
Conclusion
In closing, a few practical reminders will help you repeat this recipe with consistent results every time. We hope this guide helps you master juicy chicken and crispy tenders so your strips come out golden and tender every serving.
Focus on the buttermilk soak, proper salt and pepper balance, and the right flour mix. Pay attention to time and frying temperature so each batch cooks in the correct minutes.
Adjust the cane-style sauce to taste, and use fresh oil for best texture. Share your results with us and enjoy the process of making this recipe at home.